I've found myself become rather passionate about two things - handwriting and spelling. Two things that are so insanely important, but seem to get pushed to the side way too often. I'll talk more about spelling soon, but you can see what I use for that in this post. As I mentioned in this post, I couldn't find what I was looking for in terms of handwriting practice, so I created a pack to use with my kids. Today I'd like to share a bit about what else you can do to help your students become more legible writers. 

The number one area to tackle is fine motor strength. If your students don't have the dexterity to properly grip the pencil, it's an uphill battle. It's hard to find time for this practice in the classroom, but it will probably help more than trying to force more pencil and paper tasks that are illegible. Consider involving parents in home practice. Anything that gets their little hands moving in purposeful tasks is helpful. Suggested exercises include using Play Do or clay, snapping legos together, stringing beads, using tweezers to move small objects from one dish to another, and squeezing stress balls, cotton balls, or pom poms. Everyday activities like cutting and coloring will also help build their hand strength. 


Size Matters! Pencil size, of course. I interviewed an occupational therapist for advice and she recommends that pencils be kept on the short size, about 6 inches, about and inch and a half shorter than most standard pencils. I found this to be recommended in several other articles regarding children learning how to write. Some suggest even shorter, just enough room for the child to execute the perfect "tripod grasp".


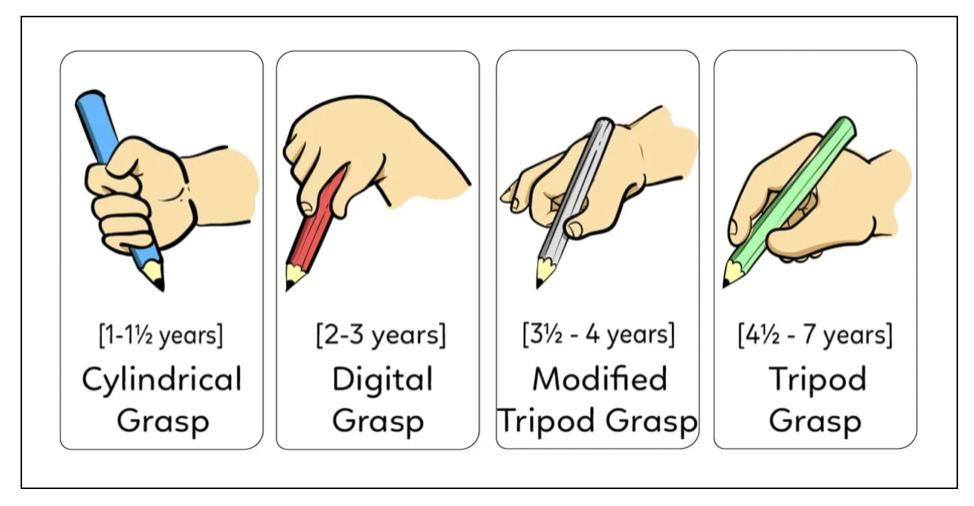
The graphic above, credited to Flinto, clearly shows the natural progression most children take on their way to the tripod grasp. After some experience holding writing devices from crayons to fatty pencils to regular pencils, they will hopefully be able to use their index, thumb and middle finger to hold the pencil in a tripod grip a few centimeters above the sharpened edge of the pencil. I know some people can write beautifully holding their pencil in all kinds of funky ways. I've seen it myself. This is just what is recommended and may be helpful to those struggling. 


I'm sharing some helpful items that were recommended by the occupational therapist I spoke to as well as tried and true products I've used in my own classroom. Especially notice the pencil grip. The wormlike foam tube we all know and love is not going to help if students are struggling with pencil grasp, although it may help students who just like the cushy feeling. 

Teacher's Favorite Pencils! The amazing Ticonderoga.  They've earned that reputation for a reason. They sharpen beautifully, they don't have plastic designs that clog up the sharpener, and you'll never get one of those weird ones that never seem to sharpen or have broken led inside. 

Good Erasers. Nothing beats the frustration of a kid ripping through their paper with a crappy eraser. No cutesy character shaped erasers. Did you know there are five main types of erasers? One of the lesser known, but amazing ones is a foam eraser. It's so highly rated for clean erasures of pencil from paper with limited damage to the paper. You can see them here. They are a bit pricey, so if you get any discretionary funds or parent donations, they are well worth it. 

Pencil Grips. Forget the foam tubes that slip over the end of the pencil, unless it's just for comfort. If you have kids who are really struggling, try grips like the ones below. This was something else my occupational therapist friend recommended.  Link to the Claw Grip HERE and the JuneLsy Silicone Grip HERE


If asking a kid to put pencil to paper sometimes backfires, try to practice in other ways. Fill a ziplock bag with some slime and have kids hold a pencil eraser-side down to practice writing letters. Try writing with their fingers on steamy shower doors (that's a home practice obviously), have them dip their fingers in water and write on chalkboards or sidewalks, try sidewalk chalk, use crayons, markers, whatever it takes to get them interested before the paper practice or even in between paper practice sessions. 

When you are ready for that paper practice, I welcome you to try my handwriting practice pack on TpT, which you can read all about in my last blog post HERE or find directly on TpT HERE.


Fitting in handwriting practice is becoming more and more difficult due to the forty bajillion other things that we have to fit in each day, but it is really important. Yes, the world is going digital, but does that mean we are going to just ignore handwriting and raise a generation of kids who can't write legibly? I sure hope not.

I've been searching for something to integrate into my routine to help strengthen handwriting, but couldn't find quite what I was looking for. So I made my own! The practice pack I've created has 180 pages of practice that all follow the same format: a short seasonal or content based rhyme to trace, then copy, then label and color. Coloring is optional, of course, but it might be motivating for some kids and make the practice seem like less of a chore.

I used a special licensed font to create this pack, so all of the letters should match the Zaner-Bloser style of manuscript handwriting.  After several requests, I've also created two additional versions: Modern Manuscript (similar to D'Nealian) and now Cursive!

Here's a page from the first few days of school. You can see how the rhyming words are right at the end of each line, making it really easy for the kids to read and find the rhymes.


Now here's a page from further in the year. You can see that because we're now using longer sentences, the rhyming words don't appear right at the end of the line. This is a great opportunity to remind the kids to read through to the punctuation, not to stop at the end of the line. To reinforce this concept, consider having them use highlighters to identify the rhymes. I'm planning on modeling this with the kids for a bit until they pick it up on their own.

I specifically made these practice pages rhyme because I found that my kids really seemed to be having some difficulty with the concept over the past couple of years. Now this can be another way to work on that skill. You can also work in some mini-lessons on word families and spelling - see how wear and hair are the rhymes here but are not spelled with the same pattern? Little opportunities for a word work discussion are present throughout the pack.

I included a cover page for each month just in case you want to print out a little pack for each student for the month instead of keeping track of and passing out individual pages each day.
Get all 180 days of practice and cover pages for each month for just 12.50. 
(it's actually on sale for $9.99 right now through July 31, 2022)
Click HERE to see it on TpT.
This year Im going to start off by using these handwriting activities for my whole class for a few minutes each day. I'm not sure what my schedule looks like yet, I'm thinking maybe when we come back in from lunch or those awkward few minutes that you always have somewhere in your schedule. As the year goes on, I may just move to having the kids who really need the practice work on the pages, or even just send them home with a few. It all depends on the needs of the kids. How do you think you might incorporate some handwriting practice this year?

I'll be sharing some more ways that I use this for more than just handwriting really soon. 

Happy Handwriting!


Back to Top