
When I was asked by Carson Dellosa if I was interested in using some of their newest decor items for a mini-makeover, it took me about a half a second to reply - YES PLEASE! I got to choose from the collections you see here. It didn't take long to settle on the Boho Birds. Adorable!
Frist, I changed my biggest bulletin board which I use to display student work. I've had that cloud paper for years (no lie) and almost got rid of it several times since I painted my boards. So glad I kept it. It makes the perfect background! The letters go with the set too and I love how big and bold they are so they pop up on the wall.


 |
| Click HERE to see them all in detail. |
Frist, I changed my biggest bulletin board which I use to display student work. I've had that cloud paper for years (no lie) and almost got rid of it several times since I painted my boards. So glad I kept it. It makes the perfect background! The letters go with the set too and I love how big and bold they are so they pop up on the wall.

It was so darn cute, I almost couldn't bring myself to add the kids' work! When I did though, it was super easy thanks to the way I added the bird cutouts. I used glue dots to stick a bird to a clothespin. Then I put glue dots on the head of thumbtacks to pin the bird to the board. That way I just have to push on the bird a little to open the clothespin and slip their work in or out. Why didn't I do this years ago?! I hope the pix help explain that a bit more...


Next, I revamped my Brain Builders Board (click here for more explanation about that). It took me forever to think of a new title, but I LOVE it! I actually made that from a clipart alphabet, but it matches pretty good, I think.

Then I changed over my other mish-mash board where I display current vocabulary words and some other random stuff. It was actually a lot of wasted space. I had plans for that board that never came to fruition this year, so I was happy to finally use it a bit better. It used to have monkeys swinging around the tree, but the birds moved in and I haven't seen the monkeys in awhile. Those small pocket charts were from the Dollar Spot at Target and the colored sentence strips were from Dollar Tree. I added some of the Boho Birds stickers and laminated them so I can write on/wipe off.

Here's a little tip for how I line up letters on posters. These stickers were part of the set. I use a ruler figure out where I want the title to start and end. Then I find the center of the title and start adding the stickers to the ruler, starting at the center and working out, with just the bottom touching. Then I lay it down on the poster and smooth down the top and gently lift up the ruler. I hope that makes sense. Maybe the pix will help...

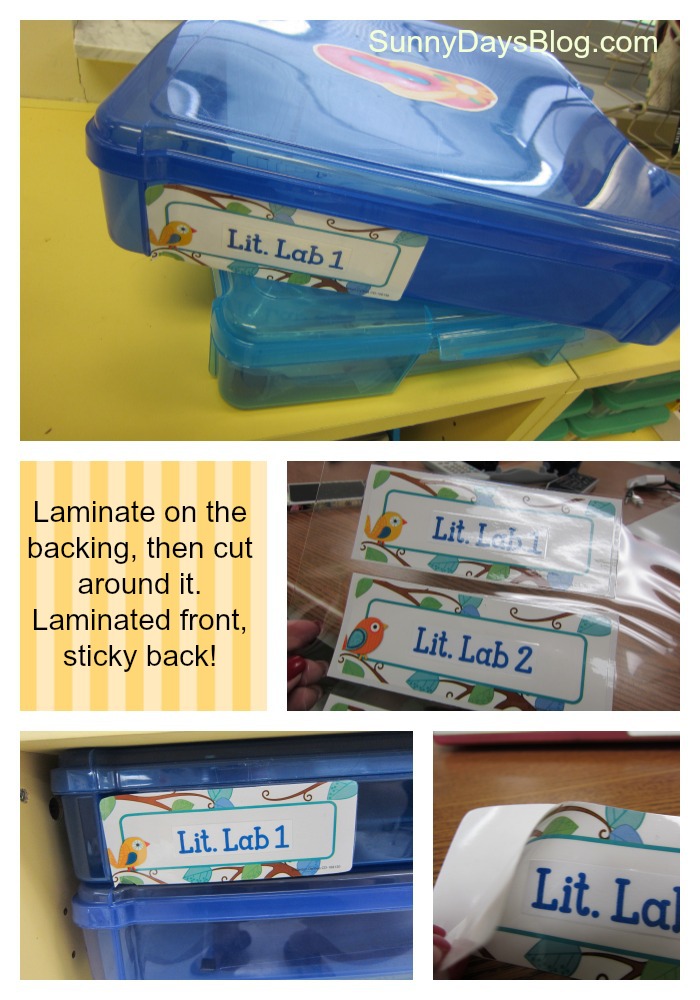
I used some more of the bigger stickers to label my center boxes. We call them lit labs. I have them all in these plastic boxes which I'm seriously obsessed with, but more on that later. I printed "Lit Lab 1" on plain paper, cut it and glued it to the label before I laminated it.
Finally, I had some fun adding cute birdie touches to some other spots around the room. Here's a leftover bulletin board bird clipped onto the can that now holds rulers. I had that can forever too. Love that I have a use for it now!

Believe it or not, there was still a LOT of stuff that I didn't even use! I have plans for it though, so you'll see these birdies again. I felt a little crazy giving my room a make over at the end of the year, but I just love the new bright and cheerful look. It turned out to be a great way to energize everyone for the final sprint. Hope you can use some of these ideas to brighten up your home away from home!
I just linked up with Teach Junkie, come join us!


Your bulletin boards and labels came out super cute! How do you get freebies from vendors?! Lucky duck! :)
ReplyDeleteAris
Sailing into Second
I l-o-v-e seeing other classrooms and your bulletin boards are freakin' adorable!! Love those cute little birds!!
ReplyDeleteSusan
T.G.I.F. (Thank God it's First Grade!)
I have to say, I've been using the clothespin trick for a while, but you ROCKED my world by laminating a sticker, then cutting & peeling off the backing!!! Genious! We have this "cold" laminator, that's great, and heavy, and sturdy, and awesome, only...once laminated, nothing will stick to it! Not Velcro, hot glue, that blue junk people swear by, duct tape, nothing! From now on, I'll be sticking on the Velcro dots first, cutting around them, on the back, and sticking stuff up everywhere! This year I finally figured out I could hot glue clothespins to the walls and hang the laminated anchor charts from those, since they wouldn't stick to anything, but they sometimes slide out of the clothespins, too.
ReplyDeleteLove it!
Brooke
Oh sooo cute!
ReplyDeleteThese boho birdies are absolutely gorgeous! I'll have to find somewhere in Australia that sells them. :)
ReplyDeleteLauren
Love, Laughter and Learning in Prep
It’s a blog with full of latest and spectacular information’s – This blog has helped me to gain much more information. I would like to appreciate the blog owner for his efforts Home Platform Lifts
ReplyDeleteLove your classroom! Now I want to redecorate. I’m having a giveaway please stop by http://littlelearnersinc.blogspot.com/2013/04/science-writing-and-art-oh-my-and.html
ReplyDeleteHow cute, my room is full of colorful owls. The clothes pin is the coolest thing I have ever used in my classroom. Makes a world of a difference for changing weekly work in kinder. :-)
ReplyDeleteSo cute and you have some great tips!!!
ReplyDeleteThose birds are ADORABLE!!! You are so lucky that you got all those great products!
ReplyDeleteBecky
Compassionate Teacher
How cute are those birds! Your room is adorable!! =)
ReplyDeleteCarrie
BuzzIntoKinder
Wow!!!! That must have taken alot of time but the bird theme comes across well!!
ReplyDeletejohn
Elementary Special Education
You did an awesome job!! You boards are so darn cute. I'm going to "steal" a couple of your ideas to use in my room next year. Thanks for sharing your idea.
ReplyDeleteConnie Anderson
www.welcometofirstgraderoom5.blogspot.com
Love the birdie theme! Everything looks great--the clothespin idea is a great one! Thanks for sharing...
ReplyDeleteSmiles,
Sarah @ Hoots N' Hollers
LOVE all the ideas! What a cute theme set going on! Pinning these ideas to use next year! LOVE the idea of laminating the labels!
ReplyDeleteChristina :)
Apples, Books, and Crayons
applesbooksandcrayons@gmail.com
AMAZING! I wish my classroom looked this organized:)
ReplyDeleteCathy
www.thecurriculumcorner.com
Sooo many great ideas!! :) I love how you use the clothes pins!! I'm definitely going to add those to my room next year! Thanks for all the ideas!
ReplyDeleteNicole
www.dancingamongstthestars.blogspot.com
So.... your ruler tip alone is worth gold in time saved making things look just perfect. Love it all and your photos were super helpful. Thanks for taking so many!
ReplyDelete-Leslie
TeachJunkie.com
KindergartenWorks.com