Welcome to the second My Truth Monday! If you missed what it's all about, click here to catch up.

Big love to everyone who linked up with me last week! It was inspiring to see how many of you really commit to your fitness. I'm not quite there, but I'm working on it.  Tamara I think you'll appreciate this one with me...


Moving on... This week I thought it would be fun to get into the Halloween spirit and talk about what creeps us out!  Here's mine:
 So, how about it, want to join the party?  Just copy the image below and link up! Be sure to use the My Truth Monday badge below on your post and link to this page. Can't wait to read about what creeps YOU out!

In Florida we do a lot pretending around this time of year. We're having a "cool" weekend in the mid 80's and I guarantee I will see at least three people wearing a scarf or Uggs when I head out to run some errands. I'll play along as I sip my pumpkin spice latte and scrunch up my shoulders against the "cold" and nod to them in fake-fall solidarity.

I don't let the fake fall and real sweat stop me from going all pumpkin-palooza in my classroom. We had a half day on Thursday, so it was the perfect time to get our pumpkin on! 

I always start by doing a RAN chart on pumpkins, then reading How Many Seeds in a Pumpkin. I love that it's set in a classroom and shows the kids arranging the seeds in different groups to skip count. Eventually the kids make a great discovery about the groups they choose to count. I'll stop here. I don't want to ruin it for you. Ha! I'll link to the book at the end of the post.

RAN stands for Reading and Analyzing Nonfiction. Unlike a KWL, those letters don't stand for the areas on the chart. I have this one in my pumpkin unit which I'll link to at the end. I like the detailed nature of the chart and how it gets the kids to think more about their prior knowledge and then reflect on it during different parts of the activity. I'll have to do a whole blog post on the RAN chart soon.

One thing I'm really working hard on lately is condensing and combining things to take up the least amount of paper possible. I used to use a version of this activity and each separate station was its own piece of paper. Each kid had a packet that was about 8 pages long! Insanity in these days of crazy low copy limits. So I made a trifold brochure for my kids to use that has 6 panels, one for each rotation. It's a lot less copies and they seem to like the novelty of the brochure effect. Hey, whatever works!


My partner and I each set up three experiments and a research station in our adjoining rooms. We had one pumpkin at each station.  The kids went from station to station as they were ready, read each direction card, made their prediction, completed the experiment or activity and rotated through the two rooms.


I've done this many different ways over the years. When I didn't have an adjoining room with a great partner, I enlisted parent volunteers to help man the stations. I've also done it with just one pumpkin with me leading the experiments in more of a demonstration style with some children assisting me while others watched and we all recorded the results. If your school prohibits Halloween parties, this would make a fun alternative for the kids. Luckily, we can have a fall festival, but it still needs to be heavy on the academics and light on the party/food/crazy sugared up children side. I'm actually ok with that!

This would also make a great day after Halloween activity, especially considering that would be a Friday this year. Half price pumpkins, here we come!

As always, I really tried my best to make this unit easy to understand and implement. Along with everything you actually need for the kids, I included teacher tips for each station, a list of resources and books, and a possible timeline. I like things that I can just print and use, without a lot of brainpower required to get it up and running in my room, so that's why I strive to do the research, formatting, and a little planning for you in everything I make. Be sure to see the links below for the book, unit and some other freebies that you might like this week!


Corny title right? I had to fit some kind of owl pun in there...

Ok, so I've mentioned this before, but I call my room the "accidental owl" theme. I managed to make it 20 years without revealing my love for any one particular thing (besides Starbucks). I had fears of becoming that teacher who mentioned that she liked teddy bears her first year of teaching and by year 7 she was bringing in mini-hammocks to "store" the fuzzy little fellows.


But my time may have run out. I think I'm now officially the crazy owl lady. You can take a peek at my room HERE to see what I mean. It's pretty subtle, but it's there. And people are starting to notice. So our latest unit of study doesn't help my cause - Owls! Oh well, there are worse things...

So to start off with I read one of my favorite books, Owl Moon by Jane Yolen.

The book is beautifully written and provides a nice level of complexity for second graders.  A young child learns how to go owling with her father. The book presents all the "rules" one has to follow as to not disturb nature and ensure a glimpse of an owl. After we explore and discuss the book, we write our own interpretation of the rules in this simple flap book.
We are on a bit of a tight timeline for this unit, so we didn't fit in too many extra things, but there is one thing I just couldn't let go of - the owl pellet dissection lab! As you probably know, owls can not digest the bones and fur of their prey, so they cough up pellets containing those bones and fur into a little mouse-looking ball. Sounds way more gross than it is, I promise. They don't smell at all and are completely dry, otherwise this lab would NOT be happening in my room! So we donned our safety goggles and dug into the pellets! I have a bunch of serious scientists this year!

Our science teacher supplied us with the pellets and this great poster to match up and categorize our samples. I also found some great printable ones. Look for the link at the end of the post.

I made up the sheet you see in the last square to record their findings and observations. They also glued some samples on it to take home. Look for the link down below.


And to further cement my owl-lady persona, our hallway display this month is also owls! We have a long cork strip, an outside bulletin board, an inside clothesline and large student work display board in our rooms. While I really do dig the cute craftivities that look amazing, sometimes I just don't have the time or justification to do them. So I created a pack of bulletin board banners that combine some writing, research, content knowledge, holiday flair, and a little bit of art. All I have to do is print and let my kids create! Better yet, they make great take home projects too.

The whole pack has 25 banners with topics like back to school goal setting, holidays, book reports, field trips and more. I haven't offered this anywhere else, but there's a freebie from that pack just for you at in the links at the end of the post. I know they've already saved me tons of time and the kids loved them!


Ok, I've been tardy to the party on the whole interactive notebook thing. I just didn't get the whole hoopla. It seemed like a lot of cutting, gluing and a major time commitment and I wasn't sure if all of that input was worth the output. I was totally that kid whining "I don't geeeettttt it".

Well, my friends, I am now a believer. After researching a bit, I was starting to see the benefit  and then when my kids were working on my Fall EZ-Prep Center, I was getting lots of questions: What's a singular? What's a plural? What's a proper noun? Sound familiar?  It was then that I really felt the lightbulb go on and I realized if they had their own little notebook with this information in it, they could help themselves without waiting for me to help them. Well, hello interactive notebooks! Problem solved!
Hard at work on Fall EZ-Prep Centers!
The biggest benefit of the interactive notebook is that after all that cutting and gluing, the kids will have their own reference book at their disposal all year long. I can even see them keeping it at home to help with homework next year! So yes, it took me a while but I'm totally on board!

I have made some great purchases, which I'll include in the links at the end of this post but yesterday when I was searching around,  I found a super cute seasonal pack from Collaboration Cuties. It was perfect because it covered the basic parts of speech which are missing from another great pack I bought but something my kids totally need. Here's my example, which I had too much fun making!


My kids already had the basic knowledge of nouns, so this a great first activity. I had them trace around the ghost before we wrote on the notebook paper so they knew exactly how much room they had to write, then I let them decorate the background a bit while they took in the whole idea of having their own notebook. Under the first ghostie, we just wrote the definition for a noun. Then I had them take their notebook with them for Read to Self. I asked them to read an entire page, then write down two nouns from the page they read. (If I just crucified the Daily Five, please forgive me. I'm a rebel) They really got into it!
Then when it was time to for Read to Someone, the first thing we did was read our lists to each other. If someone found a word they didn't think was a noun, they discussed it and made any necessary changes. The instantly fell in love with their notebooks and were so proud of them!

Tomorrow we'll be adding the common and proper noun bats from the same pack. 

There is also a great activity for singular and plural nouns, but I was so excited about the whole concept that my creative juices started flowing and I had to try my hand at making my own. One of the things I'm finding is that the intricate cutting involved in some of the activities can be a bit taxing and time consuming. So, I made this one a bit easier to cut out. I think it came out pretty cute! Who knows, maybe some more interactive notebook making in my future!
 In the free download, you'll see this version and another version that does not have the square around the top for ease of cutting. I like having options. 

Hopefully I've convinced you to take the plunge and try interactive notebooking, but if it still looks a bit overwhelming for you right now, I have a suggestion. Try doing an activity or two on a sheet of construction paper, just to test the waters. That way you you can get an idea of the time it takes and your students' level of engagement before you make a decision - and your kids will still definitely benefit from the activity!
From Me:


Other Interactive Notebooks I love:


 Just in case you missed it, check out the first of my 12 part series - My Truth Monday
There's still time to link up!


In an effort to make this big blogging community feel a little smaller, I'm starting a 12 part series called My Truth Monday. Believe it or not, that will bring us right up to the New Year! I hope you'll join me so we can all get to know each other a little bit better and have some fun along the way!

Ok, so the idea is simple. Each Monday I'll start by sharing my truth about a particular topic. All you have to do is copy the template to your desktop, fill it in, post and link up!  Sound good?

The inspiration for this idea came to me while I was taking a walk, so it's only fitting that the first topic we share about is fitness. So here's My Truth about fitness:

So, how about you? Tell us your truth about fitness by snagging the image below and linking up!

Be sure to include the badge below and link back to this post. I have topics in mind for the rest of the series, but if you have some feel free to share. If you don't have a blog of your own, share your truth about fitness in the comments!


I grew up hating math. Like super hating math. In high school I was in honors English and a class called "finite math" which was code for "the football team and Denise" I'm not even kidding. I was the only girl in the class which was made up of most of the football team and taught by the football coach. I have no idea how the heck that happened, but it made for some fun comments in my yearbook! I was band geek who normally didn't fraternize with the jocks, but they turned out to be really nice guys. They just weren't too swift in math, like me.

It wasn't until college that I started to feel that maybe I could do math. I had a professor who just had a way of explaining things that made sense to me. Or maybe my brain was just finally ready to accept math. Whatever it was, it really made an impact on me as a teacher. My early struggles with math have definitely shaped how I teach math.

One of the things I find most effective is presenting material in a few different ways. I incorporate games, manipulatives, movement, writing, partner and independent practice into just about everything we do. Right now we're working on adding and subtracting 10. This seemingly easy skill is one even my gifted kids need some extra practice because it's such an essential foundational skill.

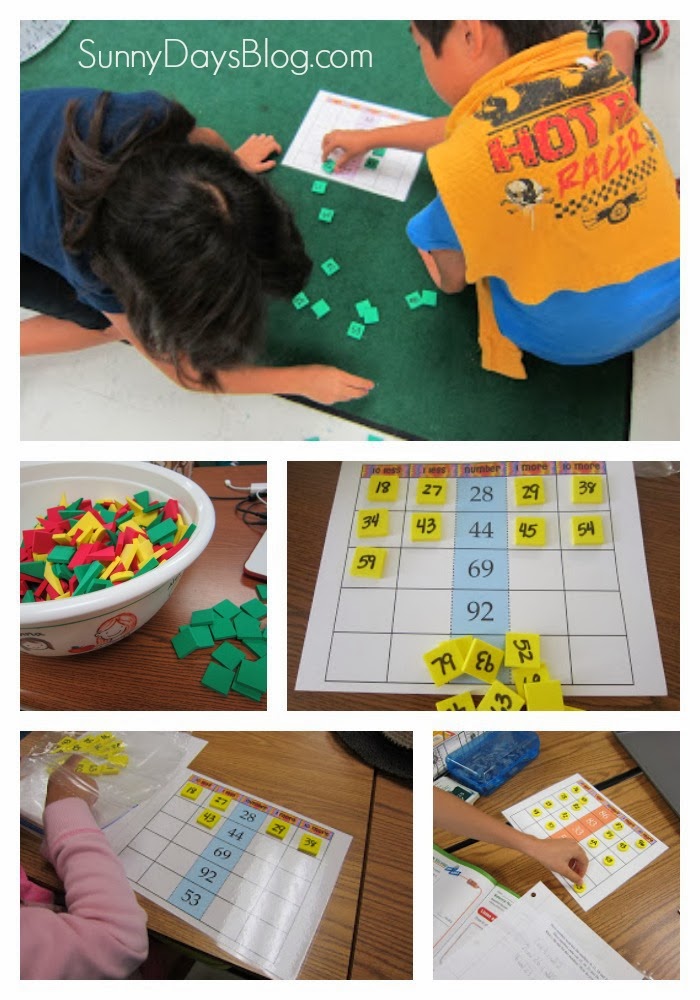
So, besides using our textbook as a resource, I have a few other things we've been using. First is a math center I made. I have an overabundance of these foamie shapes so I used them for the manipulatives. You could also use bottle caps or even just laminate and have the kids write write on the mat.
{Visit the TBA Freebie Friday linky for more awesome freebies!}

The mats come with an answer key, so I put the mat in a bag with the manipulatives and the answer key to make it self checking. Check the links at the end of the post to grab them free.

I also created some practice pages for my kids to use with dice. They basically roll two dice, make the largest number they can and add ten. On the back, they do the same and subtract ten. Also included in the freebie are pages for them to do the same with three dice and one hundred. It just adds a little fun factor to the basic practice.
How cool are those dice in dice? They were perfect for this because I only had to give each kid one. You can get them here on Amazon.

I've also been using the resources in my Common Core Essentials pack for 2.nbt.2. I created these because I wanted focused resources without a seasonal theme that I can use any time of the year for directly teaching the skill, remediation, one on one assistance, centers or enrichment. Each pack contains anchor charts, printables, journal topics, and some type of class or partner game, center, or task cards depending on the standard.


And of course, I'm using the assessments from my Common Core Assessment Pack. Since I updated it to include three assessments for every standard, I now use one as classwork, one as homework, and then one as a final assessment.

Links to the featured activities in this post:

and for a really great "get up and move" activity, 
I've been using some of her other Gallery Walk packs and they are fantastic!


Wowza! The response to my Neat Seat Organizer Giveaway with EAI Education was crazy! I apologize for the delay in announcing the winner, I was whisked away on a romantic weekend getaway which had me a little preoccupied. Picture me here with a umbrella drink in my hand. Yes, it was as heavenly as it looks...


So as we're packing up to leave (boo!) I'm just popping in to announce that the winner is <insert drumroll here> RHONDA W! Rhonda has already been notified via email and has one week to respond before I choose another winner.
The only bad part about reviews and giveaways is knowing that I'm disappointing so many people who entered and didn't win. Sorry about that, really. It does make me sad because I'm not one of the lucky ducks of the world either who wins stuff all the time. But maybe this will help. I'm guessing you have already seen this all over, but TpT reached 100,000 Facebook likes so they threw a flash sale for 10% off all purchases.

Totally caught me off guard when I came back from the pool yesterday, but cool nonetheless! To make the deal even sweeter, I put my entire store on sale for an extra 20% off <--which to me adds up to 30%, but some math guru did some serious figuring beyond my abilities and has informed us all that it really equals 28%. I'm a big fan of rounding, so in my mind it's still 30%. Sorry math guru, whoever you are. Just be sure to enter the code FB100K.

One last stop at Trader Joe's before our drive home to load up on all the goodies that I love and try to convince Joe to open a store in my neck of the woods. So far, I'm not having any luck with that one either...


Some of you may remember that I switched from desks to group tables.
You can read more about my classroom reveal here.

It's something I've been wanting to do forever and I love it! Of course, there were definitely challenges to overcome with the switch. One of my biggest concerns was how to give the kids some sense of personal space when they'd be sharing just about everything as a table. So, the first thing that came to mind was seat sacks. I researched like a loon until finally settling on some that were handmade by a seller on ETSY. They were the most affordable option I found and they seemed like they'd do the trick. While I was mostly pleased with them, I didn't love them like I wanted to.

For one, I ordered black to hide the wear and tear and the seams were very visible and sewn with white thread, which really irked me. I also had to order them based on the seat size. I ordered the correct size according to the seller's recommendations, but they are definitely too big because the edges fold over and they slide around the back of the seat. But my biggest issue is that they really hang open quite a bit when you start to fill them up. I had to resort to keeping most things like clipboards and pencil cases in the crate at each table, which is kind of a hassle.

So, when I was contacted by EAI Education about reviewing a product, it took me about seventeen seconds to try the NeatSeat Organizers! I have no idea how I didn't see these when I was looking around this summer. I can only guess my superior Googling skills must have been on the fritz.

I was initially attracted to them because of the fact that they have a top flap with a velcro closure to minimize hang and droop. I also really appreciated the way they attach to the chairs with adjustable straps so I didn't have to guess which size to order. I strapped them on as soon as I unwrapped them and was immediately impressed with the quality and design. In fact, my room mother was there as I was unpacking and she was just as impressed as I was.
Look how thin they are from the side!

I also LOVE the mesh pockets for keeping their lanyard, crayons and
other things we need to access quickly.


I was a little worried that the buckles used to adjust the straps would bother the kids when they sat with their back pressed to the chair. But not one of the kids has complained and when I tried it out myself I didn't feel the buckles either.

Here are some side by side comparisons:


I also really love the plastic sleeve so I can slip out the NeatSeat sign and add my kids' names. The NeatSeat also has a divider inside which I think helps with bulkiness since everything is not falling into the exact same spot. And can you even believe that they are less expensive than the ones I ordered?

So, I'm sold. In fact, I've ordered enough for the rest of my class. I've been using them for about two weeks and I'm still as impressed as I was from the start. I can't wait to get the rest of them because I can't even tell you how many times a day my shirt catches on the things that are exposed and hanging out of the other seat sacks. I didn't think I would like the assorted colors, but now I'm looking forward to them. What a great way to call the kids by groups to line up, get supplies, or come to help me present a concept when I need volunteers.l I can call all the blue seats, or orange seats, etc. I'm also thinking of perhaps putting all of one color at one table and then naming the tables by color. I'm still thinking that one over.

Ready for the really good news? I get to give away a set of four to one of you! If you're wondering what to do with just four, I've got some ideas for you. How about placing one on a chair at a center or shared workstation to hold the activities, games, or supplies necessary for that center? You can use them at your computer center and put recent read alouds in the pockets for students to use when taking an AR test. Maybe give one to your students of the week to use as a special little perk. You could also set up a seat for volunteers who come to your room to work with students or do tasks for you. Just fill up the sack with supplies for them!

The rules for entry are super duper easy. The only mandatory entry is to leave a comment on this blog post to tell me what you think of the NeatSeat Organizers. You also must enter using the Rafflecopter widget below because that's how I will choose and contact the winner. You'll see some other optional entries there which are not required to win. EAI has also graciously supplied a free shipping promo code that is good for purchases of $25 or more through the end of the year: SSDFS2013

Good luck my friends!
a Rafflecopter giveaway


Back to Top