Showing posts sorted by relevance for query birthday. Sort by date Show all posts
Can you even believe that I missed my own baby's birthday? My blog turned one and the day just passed by like any other! How did I let that happen? This little blog of mine brings me such joy and happiness and I let its birthday pass by unnoticed. For shame.

To make up for it, I'm throwing a belated blog birthday party and you are invited! What's a party without favors, right? So I have some fun freebies to share with you. I have been eyeing up those Pixie Stick birthday balloons floating around Pinterest, but something inside of me is saying, "You're going to give your students a ginormous straw filled with sugar...are you INSANE!?!".  Until I resolve that disagreement with myself, I'm going in another direction. Although I've been known to change my mind so who knows what I'll actually do next August when I'm setting up the room again.
I have two alternate ideas, shown in the pic above. One does involve candy - but it feels a little less panic inducing than the jumbo sugar straw. This one is a birthday candy bar.  These would be pretty easy and relatively inexpensive if you buy the candy bars at Sam's or Costco.  You can just cut and wrap them all at the start of the year (and hide them from yourself during that time of the month) and you're ready for any birthday! There is a little poem on the back says A birthday treat is always fun, but it’s not over when the candy’s done!  Bring this wrapper back to class, because it doubles as a homework pass!
Click the pic to grab your copies!


The second one is a pencil flag. Kids love a new pencil, so you can quickly and easily dress one up for your birthday kid! Just cut the flags apart, pinch it in half horizontally and punch a hole to slide a new pencil through. Fun & super cheap easy on the budget.


So, we have a celebration, we have gifts, now we need guests! I'm throwing a little linky party so that you can all share your classroom birthday ideas! I'd love to see how you celebrate birthdays in your room. Feel free to share anything birthday related - birthday bulletin board ideas, parties, freebies (just not a paid product please). You can link up a new post or even a "vintage" post, but either way, please grab the image below and link back here to this page so that everyone knows how to get to the par-tay!
Photobucket
Today is my birthday, so let's celebrate!
For today only, July 19, everything in my TpT store is 20% off to celebrate my 20th birthday! Just go with it people...it's my birthday. I'm allowed to pretend. I'm off to enjoy a day of fun and relaxation. Yay for summer birthdays!


Kids look forward to their birthdays with such excitement and expectation, that we really have to do something special to help them celebrate their special day. I've tried a few different ways to celebrate birthdays, in fact you can see some of them here.

I wanted to do something new this year, so I picked up one of those clear paint cans at Michaels when I was shopping for the Create2Educate Sweepstakes and turned it into a little birthday treat container!
See that little metal doojiggy thing hanging off the handle? DO NOT throw that away! That's how you open the can. I only found this out after standing in the aisle for about 10 minutes wondering how the heck you were supposed to get into this dang can! At one point I convinced myself that maybe you weren't supposed to be able to open it. After I worked up a sweat,  bent and broke a few nails, almost crushed the darn thing and said some not-so-nice words I actually read the tag. And calmly put the pretty little can in my basket and headed for the register. And some aspirin. So learn from my mistakes, people. You're welcome.
The "Let's Party" printable is just printed on regular paper and placed inside the can. I was going to tape it but it just kind of stuck there. There is surely some super cool scientific explanation why it stuck there because of static electricity and plastic particles molecularly attracting to the polymers or something, but I won't get all Sheldon Cooper on you. It stuck by itself. It was cool. Download the printable here if you want it.

I decorated the outside of the can with a strip of fancy rhinestone stickers. How cool are they? They peel right off in one piece and stick wherever you put them. They were a bit too long for the top of the can, so I just snipped the little glue strip right between two rhinestones to cut off the extra. A bow on top to finish it off and some ribbon to attach the all-important opener, and our birthday treat can is complete!

I'm not exactly sure what I'm going to put inside. I have birthday brag tags but they might seem kind of lonely in that big can. I was planning on making some birthday coupons, but my to-do list is getting longer than my days left to do it all. If all else fails, I believe a bag of candy will do just fine...


I'm super excited to be partnering with Michaels again for the Create2Educate back to school promotion. Let me loose in Michaels, and there's no telling what I'll create! You can check out last year's ideas here. Just like last year, I had a blast cruising the aisles and deciding what to create.

I immediately saw that burlap seems to be the "it" material this year! So I picked up an awesome burlap canvas frame and colored burlap swatches in a Mat Stack. I had an idea rolling around my head to make a birthday display so I headed over to the sticker section to get some glittery letters. On my way there I spied some great chalkboard circles and gorgeous blue silky flowers that are designed to be flip-flop embellishments (but of course I had other ideas...) and the idea became crystal clear.


I used the fantastic KG font A Little Swag as a pattern for the pennant. I cut quite a few of each color so I could play around with the arrangement and I ended up only using one of each swatch from the Mat Pack! I didn't take a picture of this part, but I lined up all the pennant pieces on a string and taped them from the back to temporarily hold them in place.

When I liked the arrangement, I put a dab of E-6000 glue behind each pennant piece to stick it to the burlap. Then I added the sparkly stickers to spell Happy Birthday!

I made a small slit in each corner of the burlap canvas and slipped the flip-flop flower in it and clipped it closed. Then I just stapled the green ribbon across the bottom of the frame and added the clothespin. 
To display students birthdays, I picked up 12 of the black chalkboard circles and some chalk markers. Now each month I'll just change out the circles! The best part is that those chalk markers erase right off with a damp cloth, so I can use them again next year!


Michaels would love to see what you can do to inspire your students this year! It's easy peasy to enter and you could win a $50 gift card!


Happy Crafting, my friends!


Hey Friends!
I'm off to my happy place for a few days. I have fallen in love with this resort and lucky for me it's just a few hours drive away.

I will be spending the next four days floating around the lazy river with an adult beverage or two.  I have not turned my teacher/school/blog/tpt brain off since school ended in June, so I'm going to try my best to actually just relax. I'll be coming back just in time to get into school early to start setting up. What??


So, before I leave, I've dusted off this vintage post from last year for those of you who may not have seen it. See you soon!


Ever opened a wedding/birthday/retirement party invite and a pile of obnoxious confetti falls all over your floor? Yeah, don't you just love that stuff? Oh, not so much?  I pretty much despise it. Well, I used to anyway until I came across this super cute idea last summer! Now I find myself picking it up off tables at birthday parties and shaking envelopes before I open them! (ok, not quite that obsessive...)

How darling is this?


I claim no ownership to this poem. I found it during some web scouring last year and the copy I have doesn't have a name. So if it's yours, thank you and please take proper credit! The poem is kind of hard to read in the picture, this is it:


We have a meet and greet the Friday before the start of school and I hand one to each kid. There are lots of  ways to present this but I like this way because it's closed up and I think it encourages the kids to really wait till Sunday night to read it. I have a little paper punch that makes two slits, but you can just as easily use a regular hole punch and tie it closed (or heck, just staple it!).

The confetti in mine is in little zippered jewelry bags that I got in the craft aisle at Wal-mart. A pack comes w/100 so you can easily split it with a friend. The confetti is from there too. One bag goes a looooong way!

Click here to get a free copy for your kiddies!
Here it is for a Tuesday, Wednesday, Thursday  or Friday start, too!
Edited to add: Here it is in Word if you need to make changes. I'm not sure if the font will get all wonky, but you can play around with it :)
Photobucket
Hey friends!
Why does it always seem that the short weeks at school are the busiest? I'm seriously only teaching for one and a half days this week and it's been nutso with all the other stuff I've had to squeeze in. Well, such is the life of a busy and fascinating teacher such as myself. What am I talking about? Well, looky below and you will see that this little ol' blog of mine has been nominated for two awards! The first one is the Busy Teacher Award (Best Teacher Blog) and the second is the Most Fascinating Blog of 2011 (Teaching Blog). Now I know, you're thinking - well isn't she all full of herself all of a sudden?! No, not really. I'm not exactly sure of the pristine nature of these fairly new awards, but it's kind of neat nonetheless. I certainly am busy, but fascinating...well, my little seven year old nuggets think I'm pretty cool. 

If you feel like making an extra click or two to vote, I'd appreciate it. I think you can vote once a day, but I won't hound remind you every day.  In this case, I kind of feel like that old cliche' feels appropriate - it was an honor just to be nominated. Ok, cue the violin music...

Online PhD Programs
Oh, and before I go be sure to check out this great contest over at First Grade Ala Carte! It's Kathy's blog birthday and the prize package is unbelievable, including one from yours truly. 
 There are some freebies for everyone as well. 
Click on the balloons to join the par-tay!

I've got some great February freebies coming up, the first of which I hope to have ready for you tonight! See you soon!


Photobucket
Don't mean to cause alarm, but dang did I get the cutest glasses from Dollar Tree! I was at a loss of what to do for my volunteers this year when I was roaming around the 'Tree, considering maybe picture frames with the kids signatures or something, when I spotted these cardboard tube gift containers. Super cute, right? I had no idea what I could put in them (although I debated with myself for a while) so I left them on the shelf and kept strolling. As soon as I turned the corner, I spotted the glasses! Of course, I turned around, jumped over the pile of marbles spilled on the floor, knocked over some off brand soap on display and sprinted back to the cardboard tubes and by some miracle, they fit perfectly inside! I scooped up 5 tubes, searched out 5 perfect glasses, got some shreddy stuff and made a beeline for the register. I may be embellishing the speed at which that all took place, but that's what it felt like...


I had 5 volunteers that I really wanted to acknowledge with a little something, but even a little something starts to add up when you have five gifts to buy. Even so, I felt like I cheaped out a bit with just the glass and cute container. I toyed with the idea of a liquor store gift card, but in the end I remembered seeing these really pretty bottle stoppers at Pier One a while ago. Luckily, they were still there! They were about $7 each if I remember correctly. I just snugged the topper into the shreddy stuff in the glass then slid the glass into to the perfect little cardboard tube and added a little personal note.


So for under $50 total, I was able to recognize my volunteers with something that I hope was a little unique and thoughtful.

P.S. They also had "congratulations" and "happy birthday" glasses. So, go...go on, run before they're all gone!


Photobucket
When I was at Michaels shopping around for my #Create2Educate Sweepstakes, which you can read more about about here, I loaded up my cart with a lot more than I needed for to make my Get to Know Me Necklaces...

Under that pile of awesomeness, are two packs of paper that I just couldn't pass up. I'm a sucker for chevron and polka-dots and I love buying packs of paper that are coordinated so that I know they'll all mesh together if I use them on a project.
I really had no idea what I was going to use them for and then I got this baby for my birthday! I had mentioned to my hubby that I wanted to make one of the famous "teacher toolboxes" and he remembered! awww...
I had originally planned to use these super adorable labels I found on Fun in Room 4b, but when I printed them out I realized they weren't quite the right categories that I wanted and they were a bit more pastel than the rest of my room. So I set about making my own. All those posts that say how easy breezy this project is...well, I'm not gonna lie. This was an all-dayer for me. And I'm pretty crafty!
So, if you're contemplating making one, let me tell you some things I learned along the way to maybe make it a bit easier on you. First, here's the finished product, which I love:

Some of the labels look a little crooked, but I think it's because the drawers aren't really in correctly.  I did not paint the outside, although I did want to and not-so-secretly still want to, but really I think I'm going to just leave it be. I think. Maybe.

One of the hardest parts was deciding what would be in each drawer! Mine is going to be more of an extra supply holder behind my desk. I keep some paper clips, binder clips, and things in or on my desk, but I have the extras stored away. So, I had to really give some thought to what things I wanted to store in there or what things I don't really use every day but want to keep handier than in the closet.

Next was figuring out how I wanted to label them. I decided to go bold.  I just printed out those labels and cut them out to put on top of the chevron paper. If those labels float your boat, you can download them here but they're nothing fancy. I just printed them on paper and cut them out.

Then I cut a bunch of the chevron paper to the size of the boxes, which is 2x4 for the larger boxes and 1 1/4 x 2ish for the smaller ones...
I thought I would just randomly put the colors in, but it looked too mish-mashy that way, so I came up a bit of a pattern that didn't offend my OCD sensibilities too much:
At that point, nothing was taped in. One at a time, I took out the chevron square, added the label, and then taped it inside the drawer. I just used regular scotch tape on the inside of the drawer. It's not so pretty, but you can't see it from the front and it gets the job done. To top it all off I added a couple of owl stickers from the Carson Dellosa boho birds theme that I have going on in my room.

So that's my teacher toolbox! I'm glad I did it but it was definitely a little more of a pain in the badonkadonk than I imagined it to be. But it's done and I'm happy. And I'm not going to paint it. The blue is fine, really. Right?

I'm finally linking up to Doodle Bug's Five for Friday Linky. Yay! I love reading everyone else's, so I'm super happy to finally have some pictures of my week to share!


1. On Monday we had a field trip to the International Game Fishing Association Hall of Fame. 
Field trips are always fun. Exhausting, but fun.


2. My kids have started to bring in their own worksheets! No lie. The little guy on the top was the trendsetter. One day he brought in a maze that he made and copies for everyone. Of course, we did it right away and he was thrilled! Then we had two more days of student created worksheets, complete with copies for the whole class. How awesome is that? I have a feeling this might continue for a while. Fine by me! The best part was watching the creators of the sheets walk around and help the other kids. I definitely heard a little of myself coming out in them, all good, thankfully!


3. I've simplified my center rotations and I'm in HEAVEN! I was trying to squeeze in two centers every day while keeping it aligned with our specials schedule, which goes by Day 1-Day 6. So on Day 1 on the specials schedule, we'd do both Day 1 centers. The problem was that if we ever missed a day, we'd be two centers behind. Then I'd try to get all four in that day. And I also had 4 kids at each center and I was changing out activities every three days! Now I have two kids at each center and the rotation lasts for TEN glorious days. Best.change.ever.

4. Wednesday was our 14th anniversary. Hubby sent me these beautiful flowers at work. The roses are a pretty hot pink color and those stargazer lilies are my favorite flower (and were also our wedding flowers) awww....

 5. My formal observation was this morning. As far as I can tell, it went really well. I won't know how it all looks on paper until next Wednesday, but in my heart I know I did the best I could and my kids got a lot out of the activity, so it's all good with me! More info on the whole project coming soon.
So, that was my week in a nutshell! Link up to Doodle Bug's party and share your week :)

Can I sneak in a #6? My friend Gina over at Beach Sand and Lesson Plans is having a fantastic birthday giveaway. Enter to win some great prizes including any product of your choice from my store!

You would think that after doing this for 20 years, I'd be able to get my room set up in a day or so. But nope, two weeks later and I STILL have little odds and ends to finish up. It's ok. It's my home away from home for 9 months, so I don't mind the time investment. I want it to be bright and cheery and homey for me and most importantly for my kids. I think I'm just about there...

Here's what I walked into. Pretty typical - mish mashy furniture on this side and all my boxes piled up on the other side. Love my vinyl decal trees that live in my library (via Target).  Those were the start of what I call my "Accidental Owl Theme". I never really had a classroom theme, but you'll see that owls and birds just kind of slowly invaded my classroom, so I'm rolling with it but I really don't want to be the crazy owl lady who gets a ton of owl gifts because everyone thinks I have a thing for owls...

This is the view walking into the room and looking right. My little library. That rug was my first Donor's Choose donation. The baskets are from Dollar Tree and holding up way better than I expected!
The little green stools are from Ikea. Directors chair from Pier One.

The little bookshelf with the vine decals on the side was in my grandmother's house from before I was born. I inherited it when she passed. My book baskets fit in there perfectly! It's nice to have such a sentimental piece in my room...

Lamp and decals from Target, solar lantern from Ikea, library labels from me (but I can't share them because they have images that I don't have permission to share. Sadsville). I added a basket for scrapbooks and yearbooks. Kids love to look at those and it's so much better than letting them become dust collectors on the shelf <--the scrapbooks, not the kids...


My new clip chart from Pink Cat Studio on tpt with washi tape covered clothespins -tape from Downtown Tape.  (I'm starting to see why setting up my room is taking so long...)

Our Behavior Bingo is just below our clip chart.


This wall needs some love. That chart is our our schoolwide Sunshine Math program. It needs a title or something. Next to the bathroom door is my birthday poster, also from Pink Cat. I still have to finish adding the names. The bins are from Target and I use them to hold extra supplies once the kids bring them in.


 My student work bulletin board that I LOVE. It's from the Boho Birds collection from Carson Dellosa.
 I used glue dots to adhere thumbtacks to the back of the clothespins, and then added a bird to the front. Changing out student work is super simple!

My computer corner, which looks a lot more impressive than it is. I'm pretty sure those computers are older than my students, but we make it work...

My task card bulletin board and brain beads wall. You can read more about that here.

I use this big book stand that I rescued from the trash(!?) to hold my Zoobooks. I can not say Zoobooks without thinking of this video...

This is part of the open shelving that runs along one wall of my room. I'm so thankful for the storage, but I kind of wish it had doors although it's easy to grab things this way. Those craft bins need a serious cleaning out but I just haven't had the time. So many of my amazing parents want to come in and volunteer already that I'm thinking this might be a good job for them :)


My horseshoe table from Donor's Choose with Marius stools from Ikea. The pink chevron basket is from Lowes and the pink organizer is from The Container Store. Each desk also has one of those for supply caddies.

I found this little stationery organizer in Home Goods a while ago and almost threw it out when I realized it would be perfect to hold these little goodies!

This is my new super favorite area. I've had these buckets from Dollar Tree for a few years. They were just stashed away in my closet almost ready to hit the "Free to a Good Home" pile, when I realized they'd be great for holding these manipulatives. Easy to grab and pass out or for the kids to go and get what they need. I made those labels in Powerpoint. You can download them here from Google Docs. There's a little note on the first page about how to customize them.


And how awesome are these fabric cubes in the shelves? I loooove that they fit so perfectly. I still need to make some labels. I have cubes for legos, pop cubes, math games, literacy centers, geography games...some are storage for me, some are for the kids to grab and use. Definitely my new favorite addition.

You can see I used ball chain keychains to attach the labels. This just makes it so much easier if I want to change things around. Plus I just like the look. I'm also loving my new extra crayon drawers. You can grab the labels from Google Docs here.

My work/copy baskets which are in serious need of a makeover but I love the color and size. Next to that is Cheer-up Chicken and my mondo collection of read alouds and mentor texts.

My desk...it's massive and I hate how much room it takes up. I do love my Tiffany blue computer case from Kuzy.

This is our gathering place. Easel from Ikea, ottoman from Walmart. Adorable Daily 5 posters ready for the first day thanks to Lori at Teaching with Love and Laughter. You can grab those here.

My Smartboard which hasn't worked right in about a year and a half. I'm about to ask them to take it out. It's so sad, but I'd rather have whiteboard space to write on than that big honkin board that just takes up space. I'm hoping they'll finally be able to fix it soon.

Love these clocks! Got them at Walmart for about $4 each. They're set to the times for lunch, specials, and recess. I need to make new signs for them that match a little better and also have the digital time so that they start to recognize the analog and digital times. Below that are my free Mazano level of understanding posters, which you can grab here.

Almost done! I didn't get a good full-on picture of this area. Those little tables are also from Ikea. That's a magnetic curtain rod for holding anchor charts on the board. Next to that is my 9-cube cubby from Lowes that perfectly hold my book boxes! If you look closely under my whiteboard ledge, you'll see racks of coat hooks. Hubs installed those for the kids to hang their backpacks. One of the best things I've ever one!  There's my impulse buy duck that really has no purpose, but I love him anyway. I also bought a new calendar from Really Good Stuff this year that has the days printed on it! No more changing the days for me every month! Yahoo! It also has a fun fact of the day and came with stickers for birthdays and holidays. Loving that! There's my Magic 8 Ball. Every year the kids love that thing! No joke. This year at meet & greet I had a whole gob of kids all grouped around something and when I went to check it out, it was the 8 Ball! Not the ipads, not the computers, not the games, not the Cheer-up Chicken...it was the old-school shake it up Magic 8 Ball!

This is the last corner. That sign was from when I was teacher of the year for the Miami Herald in my first year of teaching. I guess I peaked early. I only keep it up there because everyone gets a kick out of my 80's do. I should probably add my more recent T.O.Y plaque there too. The sign above that is a little canvas I saw at Walmart.


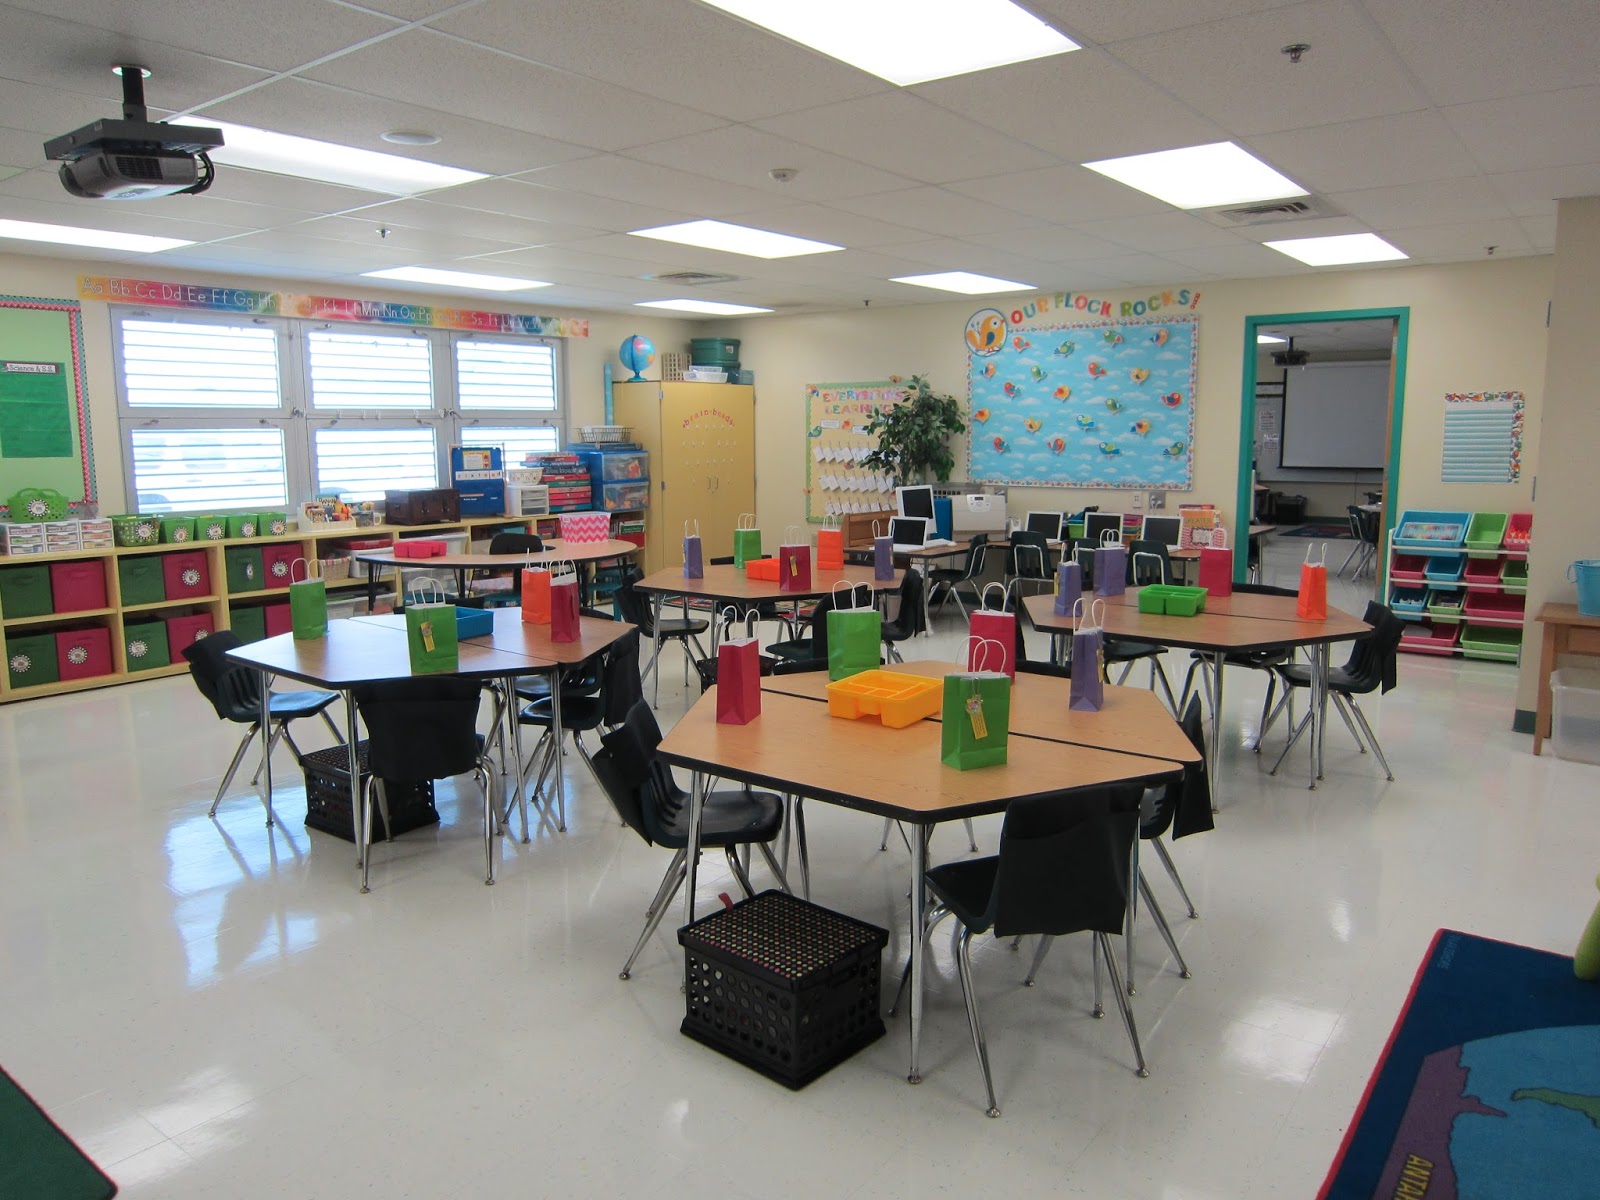
This is a full view from the front door. It looks like a giant room, but the picture is deceiving. It's not tiny, but it's not as big as it looks here.  I went to tables this year instead of desks and I love how much more open it looks! I put one of my crate seats at each table to store their books. I also ordered seat sacks from Chair Pockets on Etsy so that each kid has a little place of their own for their pencil case, writer's notebook, etc.  I'm really groovin' on the idea of flexible learning spaces right now, and my new principal totally supports it! Anyone remember the movie Weird Science, where the kids build their perfect woman on the computer and then she comes to life? Well, that's kind of how I feel about my new principal, seriously. For real. Don't hate me, I've waited 20 years for a principal like this. I have had other great principals, but there's just something different going on here now that I love.


For meet and greet each student got a little goody bag. It just makes it so much easier to make sure everyone takes home what they're supposed to!

This is what was inside: My Ready Confetti poem, magnet with our class blog and other contact info, school brochure, and their very first brag tag from Imagestuff.

I came up with this poem last minute and just printed it on cardstock. I'm hoping it saves me from having to attch 18 of them to backbacks myself, plus it explains what it is a little. I'm pretending that soon and room rhyme (poetic license & all that).

Two more little tidbits for you. Did you see that Pinterest has a set of  boards just for teachers? Here's the whole scoop, but in a nutshell, the boards have a few collaborative pinners chosen my Pinterest, who then gathered up some responsible pinners to join them. We stick to one theme and don't promote paid products or product posting, just great classroom ideas. I'm lucky enough to pin to the Classroom Decor and Classroom Management boards. Check it out!

And...in case you haven't heard, the big Back to School sale on TpT is this weekend. My wish list currently has 196 items on it. I think I better narrow that down a bit...


Back to Top